What Is White Balance In Photography? (One More Step to be an Expert)
White Balance in photography can make your images look more appealing than others. It’s not because you get some magic. It’s because you are going to understand and make it understandable to others in an easy way.
It is one of the basic concepts of photography. which is not known to the beginners or have heard of it but never applied.
If you already know about it and you find it difficult to use it in your images. It’s because the concept is not clear to you.
Here in this article, I have made it very simple for you to understand. We will cover what is it? how to use it? How to practice it? How to use the presets?, How to command over it and more?
So let’s jump in
What is White Balance in Photography?
It means “ How accurate is the color of your image to the natural scene”. Let me break it down. Before that let me explain a few things which will help you with better understanding.
Color cast
The different color you see in photographs compared to the natural color is the color cast. A yellow, blue, orange, or green color that appears in the entire picture. Its happens due to the color temperature
In simple languages the layer of color in the entire image.
Color temperature
Every source of light you see has its color and every color comes along with the temperature. Which is measured as “K” known as Kelvin? It was named after the name of the person who invented it.
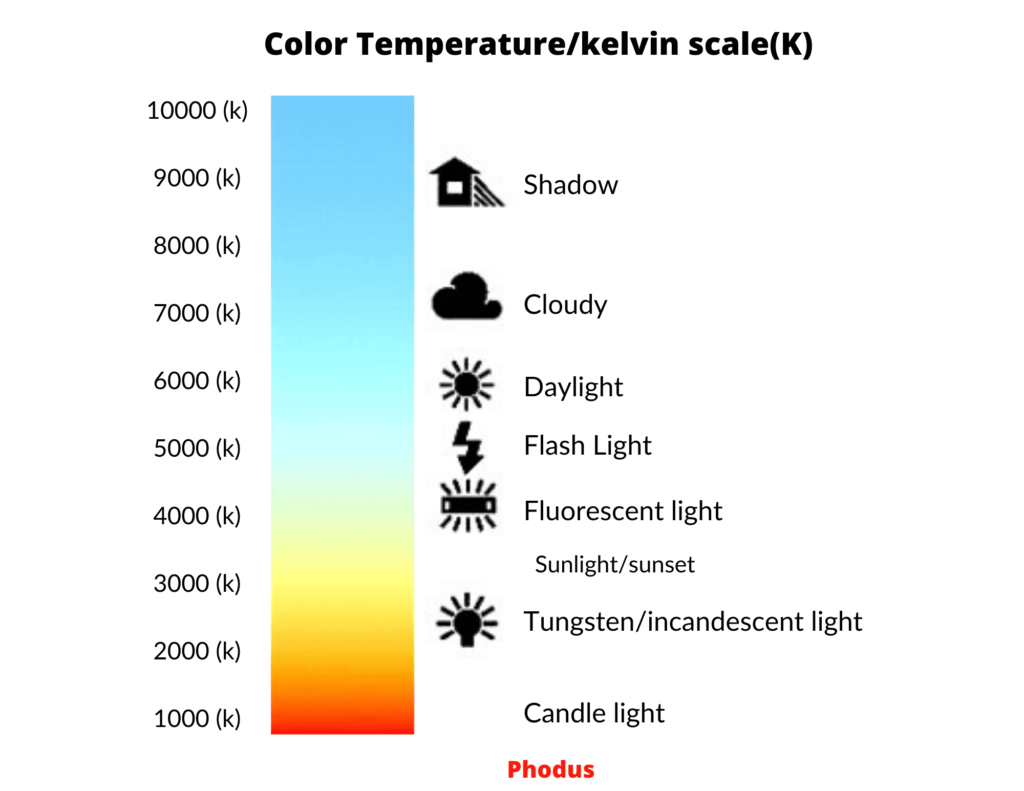
The color temperature varies from different lighting conditions. It generally has a yellow, orange and blue color. The higher the kelvin Temperature bluer will be the color and lower the kelvin no. more orange will be the color.
Check out the below image and you will see how the color changes when the temperature changes.
The color temperature also comes up with different hues and tint. Which looks green and magenta. So you can see these colors also as a color cast in your images.
I hope you understood these two things. These two will help you understand the white balance.
Now lets come back to White balance.
The balancing of the colors to make it look as natural as possible. while taking white color as a reference is white balance. Isn’t it that simple?
Yes, it is.
When we human’s see white color it appears white to us in any lighting condition. Whether it’s daylight or nightlight. Our brain is very smart. Whenever we see any object it adjusts automatically and white looks white.
For example, lock yourself in a room and look at any white objects say a book. Now put on a yellow bulb and look at that white object again. You will see the difference but after some time, it will appear white only.
But the camera is not as smart as our brain. It cannot identify the white color as white and end up with the color cast. A warmer image(orange) or a cooler image(blue).
When you click a picture the color might not appear as it looks in the real scene.it appears with a color cast. Because the camera could not compensate for the white balance. In this case, you have to give the command to the camera. To correct the white balance and make the images look as accurate as possible.
The camera has a color sensor. Which adjusts the color temperature and make the picture look natural in color.
Here is the final word.
“ White balance is a setting in your camera. which allows you to capture the image as natural as possible in color”.
“The white balance adjusts the color temperature to avoid the color cast”.
Lets take an example for this
There are many ways you can set the white balance in your camera. Let’s see.
Where to find the White Balance in Your Camera?
Every camera has different settings for it. It depends on the maker of the company. In most DSLR and mirrorless cameras, you will find it in the settings menu and also in the body with the sign “WB”.
If you still didn’t find it in your camera then please check the user manual of your camera. You will get it there. Or else comment below with your camera name and model. I would love to help you with it.
Now let’s see how to use it?
How to use the White Balance Setting?
The different ways in which you can set the white balance are as follow:
- Auto mode
- Presets modes
- Tungsten Light
- Fluorescent light
- Sunny/daylight
- Flash
- Cloudy
- Manual Modes
- Custom Mode
- White/Grey Card
- Shoot in Raw
- Use light temperature
Auto Mode
In this mode, the camera adjusts the color temperature automatically. And present the photographs as accurate it can be. In the frame, it takes a white color as a reference and adjusts the white balance according to that.
This is the most simple and easy way you can get accurate color in the pictures. This is the best method you can use to get rid of the color cast.
But there are some cases where the camera doesn’t find any white color in the frame and get confused. Which ends up with a color cast in the picture. And to avoid that you can use the present or the manual modes.
Let’s check out with the available presents in the camera
Presets for White balance
DSLR and Mirrorless cameras have built in presets to balance the white color in your camera.
Tungsten/incandescent light
Yes, I am talking about the light bulb. Which looks yellowish. So when you click you may find the yellow color cast in the image. The image looks warmer. Now set this preset and you will see the difference.
The image will adjust the yellow color cast and make it look a little cooler and a little blueish. By adjusting the white balance.
In this, the kelvin temperature is set as preset which is around 3000k
Fluorescent light
The light you see in the tube lights. In such conditions, the image looks cooler. Which is bluish. So when you set the Fluorescent preset it will warm the image. To make it look as natural as possible. The kelvin temperature of this light is 4000k
Sunny/Daylight
In outdoor shoots, there will be plenty of light. The color temperature will be approx 6000k. In this situation, The AWB mode will work pretty well but in case you want a more fine result in the color. You can select this preset. Which will make the image more natural to the scene.
Flash
In low light situations, you use a flashlight. This will be the best preset. Its color temperature will be somewhere 5000K to 5500k and will make your image look natural. Whereas in a flashlight it might look bluish.
Cloudy
In cloudy the color temperature will be somewhere between 6000 to 7000 K. Which will color cast your images with blue color. So to avoid that you can use this present to make it look more accurate or warmer.
Shady
The shadow of a house or any object. The color temperature of this light is approx 8000k. you will get a cooler image in this. but choosing this preset will make the image more warmer and natural.
Manual Modes
If you want more accuracy of color in your photographs than go with this mode. The professionals use this mode. There are many situations where the camera fails to understand the lighting condition. In such situations, you can use the manual modes.
There are two ways you can do it manually i.e Custom mode and Grey/white card.
Custom Mode
In custom mode, you can set the kelvin degree by yourself. For that purpose, you have to understand the range of color temperature. With its kelvin degree. It will help you to understand the color temperature of the light source.
Here is the list of the color temperature. When the kelvin is high the image will be more cooler which means bluish. When the kelvin is low the image will appear orange/yellow/red.
It is because the temperature of orange and yellow has low kelvin and blue has high.
Where will you find the custom setting?
Take your camera and open the setting menu and go to the sign W/B and open it. There you will find all the presets which we have already talked about above. In that section, you will find the custom option or color temp.
Click it and set the kelvin no. as according to the correct lighting condition. As a beginner, you may find it difficult to opt for this model. But nothing to worry about.
It just required to understand the concepts and the kelvin no. and rest how well you practice. So take your camera now and give a try.
The other manual option or you can say the semi-manual option is the White/Grey card method.
Let’s check it out
White card/Grey card
There are many situations where the camera couldn’t identify the white color. Also sometimes there is very little or no white color in your frame. In that case, you will receive a huge color cast in your image.
So what to do here?
In this method, you will give a reference point or reference to take a white color. That you are going to do it with a white or a grey card. Take a white card or a white paper and click a picture. While pressing the white balance.
The camera will take this white as a reference white color and balance the color temperature to produce a natural color image.
It gets difficult in a situation where the light condition is changing frequently.
There are other ways also to set the white balance. Let’s check it out.
Shoot in Raw
There are two file types in which the data is saved in the memory card of your camera. One is Jpeg and the other one is a RAW file.
A raw file is a compressed file. In which more light information is collected compared to the jpeg file. You have more opportunities to play with the raw images in post-production. To create better images.
Whereas in jpeg you get room to edit in post-production but with very little information. Which results in a low-quality image.
The point here is that the color cast can be fixed in post-production if you have clicked the images in the RAW file.
Nowadays in most of the DSLR and mirrorless cameras, you will find both the option to select together. It means the image will get saved in both the files jpeg+RAW.
So if you don’t want a long process and want to get the best white balance from the camera itself. Then his method is not for you. But there are many professional photographers. Who shoots in raw to create high-quality pictures.
There is one more way you can adjust the white balance.
Use Light Temperature Meter
There is a light temperature meter available in the market. Which helps you to check the color temperature to avoid the color cast.
Before starting the shoot check the light temperature. And then set your white balance. You can also set by the presets available on your camera.
As a beginner it kind of extra work for you. So you can avoid it for now. And leave it for those who need it.
How to fix white balance in post-production?
There is many software available to fix the white balance in post-production. The best and most used in the industry are the Adobe Lightroom and Adobe Photoshop.
In both the software you have the color change to fix the color cast by fixing the hues and tint. Even there are presets available in it. Which you can use as per your image needs.
If you shoot in Raw file you have more room to show your creativity in the lightroom and photoshop.
Many photographers do Photo manipulation in photoshop to create beautiful images.
As a beginner photographer, you will find it difficult to use this software. But don’t give up and if possible learn photoshop and lightroom. It will take your image to the next level.
Camera Vs Post-production
It’s up to you to decide which one is best for you. It fixes the white balance in the camera itself or you love to fix it in post-production.
Fixing it in-camera will save you time. But there are many cases when the image is well clicked but you find a color cast over it. So you can fix that in post-production.
You can say these two are interrelated these days to produce high-quality images.
As a photographer, you should know how to fix it in post-production also. It adds value and advantage to your skills.
Conclusion
So now you know about white balance. It will not work until you practice it yourself. Because in a few days you may forget it. But when you practice, it will become part of your photographing process.
In this article, you have learned the following things.
- Color temperature
- Color cast
- White balance
- How to find it on your camera
- How to use it
- How to fix it in post-production
If you still left with any doubts feel free to comment below. I would to hear it from you.
Also if you are looking a complete guides to photography. It mentioned below topic wise.
- What is Shutter Speed?
- What is Aperture?
- What is ISO?
- What is Exposure triangle?
- What is Rule of thirds?
And if you, are a beginner and want to take your photography to next level then check below mention.
Another one, if you want global exposure and growth check out this.