What Is Camera Modes In Photography?
Camera modes in photography are also known as “shooting modes” in photography. It is the different parameters available in most of the digital cameras these days. Which allows you to control the exposure while capturing a scene.
When I first bought my DSLR Canon 90D, My hand grabbed the camera and my pointer finger went to the shutter butter. As the design was so handy. I was aware of the shutter button as I had used a film camera in my childhood.
Pressing the shutter button got me my first picture and it was amazing. In a click, I got such an image. It was all automatic.
The camera was by default set to an automatic mode.
Likewise, there were many other modes in the dial. There were many ways to capture light. Which was categorised by different names by different companies.
This might happen to you also as a beginner photographer. But gradually you will learn and understand the shooting modes of your camera.
Here in this article, you will learn about the camera modes and how to use it.
So let’s dive in.
What are the camera modes/ Shooting modes?
If you know the phenomenon of the camera. It captures the light from the scene that goes into the image sensor to form an image. Your camera has different parameters that control the light. To get a proper exposure image.
“The different buttons available on your camera. To capture an image in different ways is the modes”
There are many modes available in digital cameras these days. Which can be divided into three segments Automatic, Semi-automatic, and manual modes.
Before going through the different modes. I will recommend you to go through the Exposure. And the elements of Exposure to better understand these modes.
These are the pillars of photography that control the exposure/light.
Lets check the available modes.
Automatic modes
- Auto mode
- Portrait mode
- Macro mode
- Sports mode
- Landscape mode
- Night Mode
Semi-Automatic modes
- Shutter speed priority mode
- Aperture priority mode
- Programmed mode
Manual mode
Automatic Modes
In this mode, you just have to press the shutter button. The camera will do the adjustment itself to produce a well-exposed image. But automatic mode does not work all the time. You can say it is for beginners who have shifted from mobile to DSLR.
Let’s check it
Auto Mode
In auto mode, you don’t have to worry about the exposure setting. Once you press the Shutter button. The camera does its job automatically. Decide the frame and click the shutter button that’s it.
In this mode, the camera adjusts all the elements required for the exposure. The camera decides the Shutter speed, Aperture, ISO, and white balance itself. These days DSLR and mirrorless cameras. The technology has gone so advanced that even the flash pops out if the scene required it.
This mode is seen with the symbol of a green blanket or “A” written on it. It may vary from camera to camera.
This mode will help you to understand the concepts of digital photography and how it works?
If you are a beginner you can start with this model. You will get an idea of exposure, composition, framing, and other aspects of it.
Sometimes professionals also use this mode. To check the light condition of the environment. After checking the exposure setting i.e the shutter speed, aperture, and ISO. and Analysing the Histogram. They set these elements according to their requirements in the manual mode.
Later in the article, you will learn about manual modes in photography. Now the modes I will discuss under automatic modes. Are meant for specific types of photography.
Portrait Mode
This mode is designed for capturing portraits. When further you will learn about photography. You will understand how to capture a portrait’s shots manually. And what are the concepts required for it?
While capturing portraits the major focus is on the face of the subject. Where the rest of the things need to be ignored. That’s the reason expert photographers blur the background in portraits shots.
When you select this mode, your camera is designed in such a way that it will act to capture a portrait. Where the focus will be on the face of the subject with shallow Depth of field.
It keeps the aperture fast to control the depth of field and adjust the shutter speed and ISO. To get the correct exposure.
But in this mode to get the blurred background you have to check the distance of the camera and the subject. Try to be as close as possible until your camera and frame allow you.
These mode is indicated with the symbol of man’s face in the dial button. It may be different in another camera.
I rarely see people use this mode but as a newbie, you can try it out. Also, it will be helpful for you to move on to Semi-Auto or manual modes. If you want to excel in your photography skills.
Macro Modes
This mode is for capturing small objects. Anything smaller than the camera like flowers and insects. You can also call it a close up mode rather than calling Macro mode.
Macro photography is a different thing where you have to use a macro lens to capture macro objects.
In this mode, you have to bring your camera close to the subject to capture it. Otherwise a lot many things will be there in the frame.
Though this mode works in the concept of macro photography. Where the focus is on the subject and resets of the things are ignored by blurring it.
When you set to this mode the camera understands what type of photography you are going to do. It will set the large aperture to get the shallow depth of field. And keep the shutter speed high if the subject is in motion. And for proper exposure it compensates with the ISO.
It not only compensates with the ISO. It adjusts all these exposure settings automatically.
It is indicated as a flower symbol in the camera dial. But it may differ in your camera as it depends on the companies.
According to me, all these automatic modes are for fun. You can check it if you are a beginner.
Sports Mode
This mode is meant for capturing a subject in motion. In sports photography subjects are in motion or fast. In that case, you have to freeze the moment into your camera.
So in sports mode, the settings are built in such a way that the moving subject will freeze. For example, baby playing, butterfly flying, and a cat running.
In all these scenes the subject is in motion. This mode will help you to freeze the subject in the frame. But it may not work well in all situations. Like a fast-moving car, you might fail to freeze it with this mode.
If it gets frozen you will miss the details of the image. For that purpose, you have to use manual mode.
The exposure settings that this mode carries while shooting is. Fast Shutter Speed to freeze the moment. Aperture, according to the light condition. In a low light situation the camera will consider a high aperture. Then ISO will be compensated to produce proper exposure.
This mode is indicated as a symbol of “man running fast”. You can find this in the dial button of your camera.
As a beginner to understand the exposure setting you can use these modes.
Landscape mode
You might have heard of Landscape photography? Yes, you got it. Capturing all the natural stuff like land, tree, sky, ocean, and whatever. In such photography, there are many things in the scene.
So this mode is meant to capture such landscape or wide-angle shots. Where almost everything in the frame is clear and sharp.
In this the aperture plays a vital role. To keep most of the area in focus the camera keeps the aperture very low it means large in numbers. And for proper exposure, it adjusts with the Shutter speed and ISO.
You can also use a tripod to avoid camera shake. If the light condition is low. The shutter speed will get long and you may end blurry images. So you can use a tripod in low light situations.
Again this was an automatic mode. Where you just have to select the mode and press the shutter button. The camera does its job.
It is indicated as a “mountain shape” in your camera dial. If you are starting photography and are fond of landscape and nature. Go try this mode.
It will help you to understand the exposure setting required for a wider depth of field.
Night Mode
This mode is best for doing photography at night. At night there will be low light conditions. So the camera will adjust the exposure setting according to that.
The aperture will be high and the shutter speed will be slow. The ISO will be high to get an adequate amount of exposure.
In this case, the flashlight may pop out to add extra light to the image.
You can try this mode for capturing the moon or a city at night. You can also use this mode for creative shots. Like capturing artificial lights.
This mode is indicated as a “half-moon” shape in the camera dial. Again this mode is for the one who has shifted from mobile to digital camera. And are curious to check the night mode in night light.
Now let’s check the second modes available in the camera.
Semi-Automatic modes
In this mode, you take control over one element of the exposure triangle. The other things are adjusted by the camera itself. That’s why it is a semi-automatic mode.
Let’s check out with the modes
Shutter Speed Priority Mode
In this mode, you set the shutter speed yourself as per your photographing needs. The camera compensates with the aperture, ISO, and white balance for correct exposure.
The main role of shutter speed is to control the light, freeze the subject, or to create motion blur. When the shutter speed is high the moving subject will freeze. When it is slow the moving subjects will get blurred.
Photography like sports events or wildlife photography. The high shutter speeds are used to freeze the moments.
In photography like a waterfall, the slow shutter speed is used to motion blur the water. It gives a sense of moving water.
You can use these modes when the subject motion is unpredictable. And you dont want to miss freezing the subjects.
You can use this mode when your main focus is to freeze the subject. And don’t want to use your head for compensating with the aperture and ISO.
You will find this mode in the camera dial. Which indicates whether “S” or “Tv” depends upon your camera.
Shutter speed priority mode can be used in Street photography, a bird in flight, motorsports photography, etc.
The next one is.
Aperture Priority Mode
This mode is like Shutter speed priority mode. But in this mode, you have control over the Aperture. You set the Aperture according to your scene’s need. And then the camera adjusts the Shutter speed, ISO, and white balance automatically.
Aperture also has its role like shutter speed. It affects the exposure and controls the depth of field.
If the aperture is large(small in no.) more light will enter the camera and there will be a shallow depth of field.
If the aperture is small(large in no.) less light will enter the camera and there will be a wider depth of field.
It depends on what you are photographing. According to that, you set your aperture. And the rest of the exposure settings are adjusted by the camera itself.
In this mode aperture is the main concern, other things are controlled by the camera.
Let’s say you are clicking portraits of a model. The main focus will be on the model face. To keep the focus on her face you have to create a shallow depth of field. That will be created by a fast aperture.
This mode is also preferable in situations where there is low light. Like wedding photography.
This mode is used by expert photographers also. If you want to learn and have control over aperture settings. This is the best mode to go with
Programmed Mode
This mode is like “Auto mode”. The only difference is you can set constraints to the exposure elements. You can set the limit to the ISO for example 1200. The camera will select ISO between least to max 1200 only.
It is the same with Shutter speed and aperture. The mode is found in Nikon cameras. It’s not there it all cameras.
Manual Mode
You can say this is a professional mode. As you have control over all the elements of exposure settings. This mode is highly used by experts. It allows you to capture images as per your requirements.
If you are a beginner. You can start with auto mode but try to shift to manual mode asap. The more you practice with the manual mode the more it will help you to improve your photography skills.
This mode is indicated as “M” in the camera dial. When beginners think of this mode they get confused. How to use manual mode?
But you need not worry about learning it. By proper guide and practice, you can also click like an expert photographer.
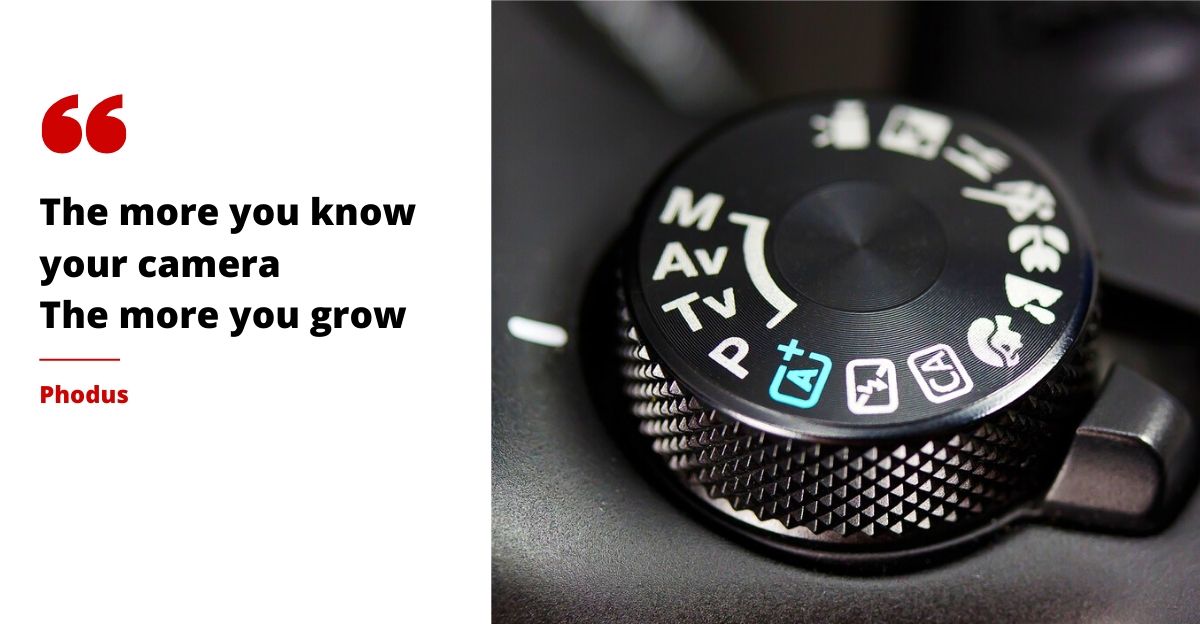
Where to find these modes in your camera?
You will find these modes in the dial button of the camera. The position of the dial depends on the camera to the camera. Most of the digital cameras you will find it in the above lift side of the camera.
In flagship cameras, you may not find the auto modes. Also if you are not used to the high-end cameras you have to check it carefully to find the manual mode button.
Which mode is best?
If you will ask my best mode. I will say “ Manual mode” as it has a very dynamic range. And better control over the exposure.
But for many photographers, they prefer Shutter speed priority or aperture priority mode. I rarely use these modes.
When you have learned photography and gone through the complete photography guide. I will suggest you go with “Manual mode” or you can practice with “Semi-auto mode” also.
Conclusion
Now that you know about the camera shooting modes. It’s your time to do some practice. Go grab your camera and start it in any mode you want. But I will suggest you start manual mode asap.
You can start with manual mode as if your camera doesn’t have any other modes.
If you still have any questions feel free to drop a comment. I will reply to each question.
Check out the complete photography guide
Being a photographer you may find this interesting. Check it out now
Do you want to improve your photography skills by participating in photo contest.